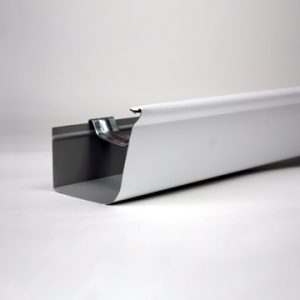
Before You Purchase Gutter Foam You Need To Identify Your Gutter Type
There is a 90% chance that your residential gutter will suit Gutter Foam GF130
Below is a list of the most common gutter types:
HALF ROUND
Use: GF130
MARLEY
Use:
GF130
OG CLASSIC 125mm
Use: GF130
1/4 ROUND 135mm
Use: GF130
LARGE OG CLASSIC
125 x 75mm Use:
GF130
150 x 90mm Use:
GF150
BOX
Use: GF130
LARGE 1/4 ROUND 135mm
145 x 80mm Use:
GF150
135 x 75mm Use:
GF150
HALF ROUND
Use: GF130
MARLEY
Use:
GF130
OG CLASSIC 125mm
Use: GF130
1/4 ROUND 135mm
Use: GF130
LARGE OG CLASSIC
125 x 75mm Use:
GF130
150 x 90mm Use:
GF150
BOX
Use: GF130
LARGE 1/4 ROUND 135mm
145 x 80mm Use:
GF150
135 x 75mm Use:
GF150
HALF ROUND
Use: GF130
MARLEY
Use:
GF130
OG CLASSIC 125mm
Use: GF130
1/4 ROUND 135mm
Use: GF130
LARGE OG CLASSIC
125 x 75mm Use:
GF130
150 x 90mm Use:
GF150
BOX
Use: GF130
LARGE 1/4 ROUND 135mm
145 x 80mm Use:
GF150
135 x 75mm Use:
GF150
4 Steps To Installing Gutter Foam
The installation of Gutter Foam is incredibly easy. Following the instructions below will ensure a simple process.
STEP 1
Clean out the gutters & down-pipes with a scoop, brush, and running water.
STEP 2
Make sure that your gutters are clipped into the brackets and have the correct fall.
STEP 3
Be sure to start your installation at the corner of your gutters.
STEP 4
Place the next length of filter foam into the gutter compressing it by 5mm.
In-depth Installation Instructions
Step 1 – Clean out the gutters & down-pipes with a scoop, brush, and running water. This makes sure that they are free of leaves, debris, and sludge. *Ensuring your access point or platform you will be working on is safe and secure. Climbing on roofs & up ladders is risky – consider using a qualified installer.
Step 2 – Make sure that your gutters are clipped into the brackets and have the correct fall towards the downpipe outlets. Incorrect fall to the downpipes will impede the performance of any spouting system.
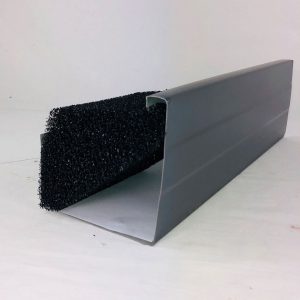
Step 3 – Start your installation at the internal corner of your guttering as it is best to have a full length of filter foam at these points. You will need to cut a mitre joint, typically 45°. Ensure that the front “sharp” end of the foam is tucked into the front lip of the gutter and the back of the foam is pushed to the fascia side of the gutter and then tucked nearly under the bottom edge of the roof overhang.
Step 4 – Place the next length of filter foam into the gutter and be sure to compress it by 5mm against the previous length, leaving no gaps.
NOTES: If your gutters have internal support brackets that are low in the gutters you may need to cut the underside of of the Gutter Foam inserts with a sharp knife at the point of each internal bracket. The Foam will straddle the bracket. With high support brackets, like with Marley® Spouting Systems, the Gutter Foam can tuck underneath the bracket of cut the foam into shorter length to suit the distance between each bracket.
TOOLS REQUIRED: Sharp box knife or a sharp kitchen knife, and a tape measure. Gloves are necessary to protect your hands and fingers from being cut on the sharp edges of the roof and gutter.
In-depth Installation Instructions
Step 1 – Clean out the gutters & down-pipes with a scoop, brush, and running water. This makes sure that they are free of leaves, debris, and sludge. *Ensuring your access point or platform you will be working on is safe and secure. Climbing on roofs & up ladders is risky – consider using a qualified installer.
Step 2 – Make sure that your gutters are clipped into the brackets and have the correct fall towards the downpipe outlets. Incorrect fall to the downpipes will impede the performance of any spouting system.
Step 3 – Start your installation at the internal corner of your guttering as it is best to have a full length of filter foam at these points. You will need to cut a mitre joint, typically 45°. Ensure that the front “sharp” end of the foam is tucked into the front lip of the gutter and the back of the foam is pushed to the fascia side of the gutter and then tucked nearly under the bottom edge of the roof overhang.
Step 4 – Place the next length of filter foam into the gutter and be sure to compress it by 5mm against the previous length, leaving no gaps.
NOTES: If your gutters have internal support brackets that are low in the gutters you may need to cut the underside of of the Gutter Foam inserts with a sharp knife at the point of each internal bracket. The Foam will straddle the bracket. With high support brackets, like with Marley® Spouting Systems, the Gutter Foam can tuck underneath the bracket of cut the foam into shorter length to suit the distance between each bracket.
TOOLS REQUIRED: Sharp box knife or a sharp kitchen knife, and a tape measure. Gloves are necessary to protect your hands and fingers from being cut on the sharp edges of the roof and gutter.
Open cell polyurethane foam filter insert that prevents leaves & tree debris from entering your gutters